Mockitt AI · Process mapping

AI Flowchart Generator

Turn process descriptions
into flows your team can follow.

Describe who starts the process, the steps involved, and what happens when each step succeeds or fails. Mockitt AI turns that description into a flowchart draft. Review the decision rules, edit the nodes and connections, and give your team a shared view of the process.

Text to flowchartDecision branchesEdit online
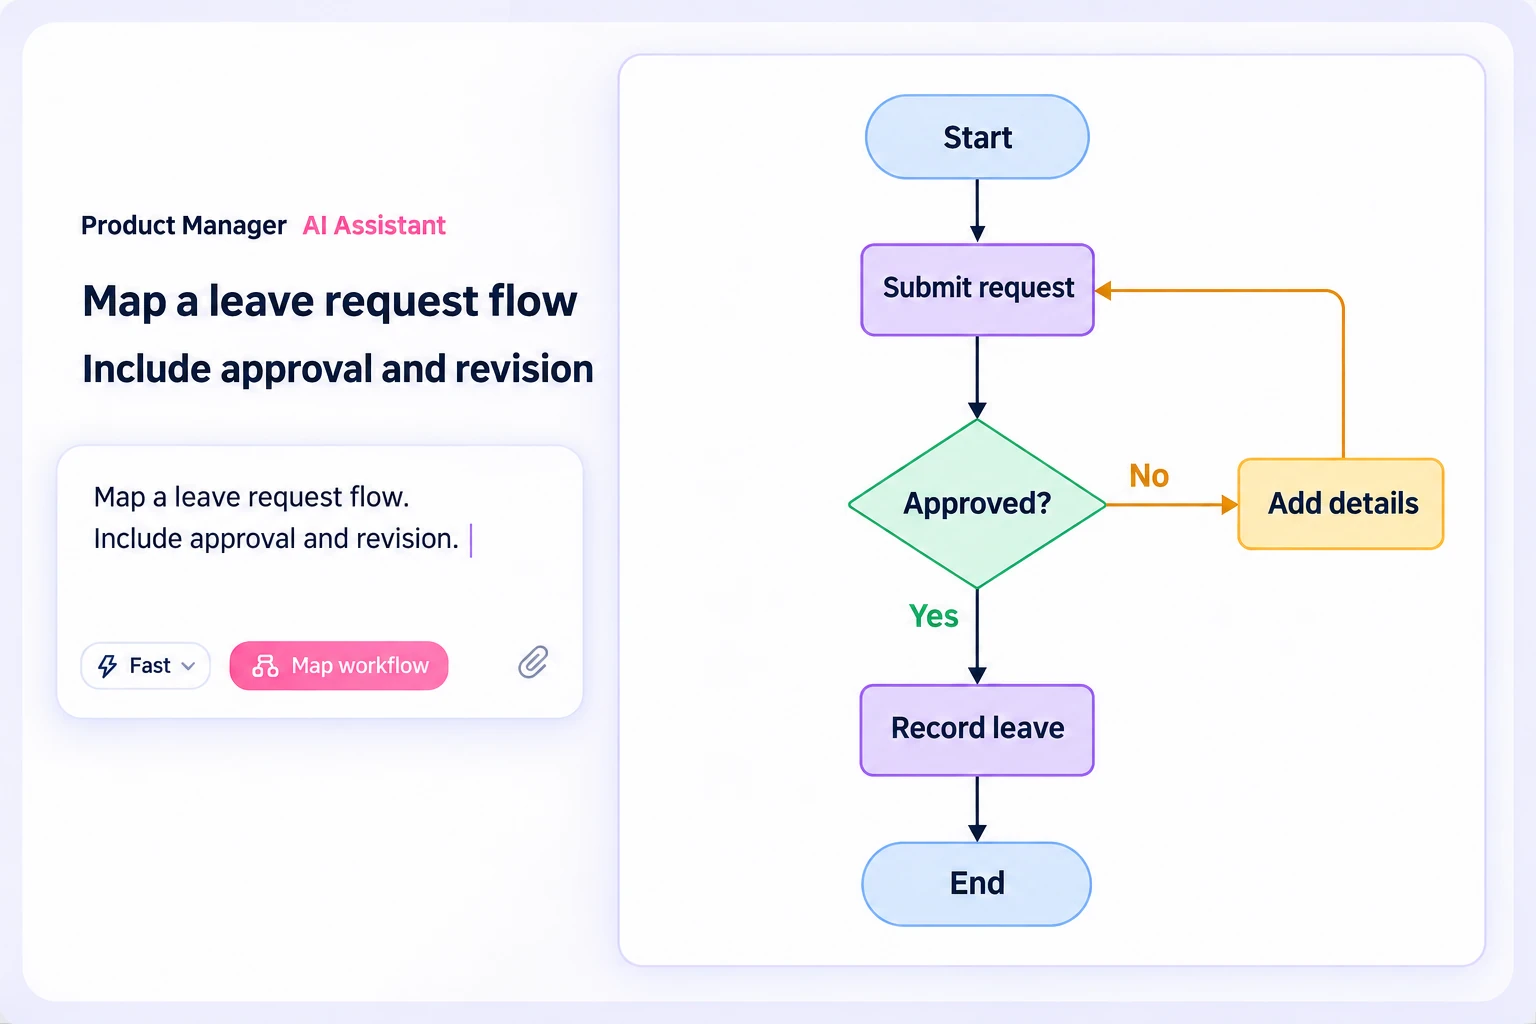
Time-off request flowchart with an approval path and a return loop for additional details
Show what happens after approval and where a request goes when it needs changes.

Start with your process

A clearer description
makes a more useful first draft.

“Make me a flowchart” leaves too much unsaid. AI cannot know which business rules you have left out. Include these three kinds of information to build a main path your team can check.

01

Define the start and finish

Name the person who starts the process, its trigger, and the final outcome. For an approval workflow, include what happens after a request is approved, such as recording the decision and sending a notification.

An employee submits a time-off request for their manager to review. If approved, record the time off. Otherwise, return the request to the employee for more details.
02

Give each branch a clear condition

Replace “handle as appropriate” with a specific question. For each decision, list the possible outcomes and the action that follows each one.

Check whether the event has seats available. If it does, open the registration form. If not, offer other events to explore.
03

Give exceptions a way forward

State what is preserved and where the flow resumes when submission fails, information is missing, or a request is returned for changes. Each exception needs a next step.

If submission fails, keep the information already entered and allow another attempt. If it succeeds, show the registration result and end the flow.

An event registration example

Map the successful path
and the way back from a failure.

In event registration, “Are seats available?” and “Did submission succeed?” answer different questions. Separate the business condition from the system result so your team can decide when to stop and when to offer a retry.

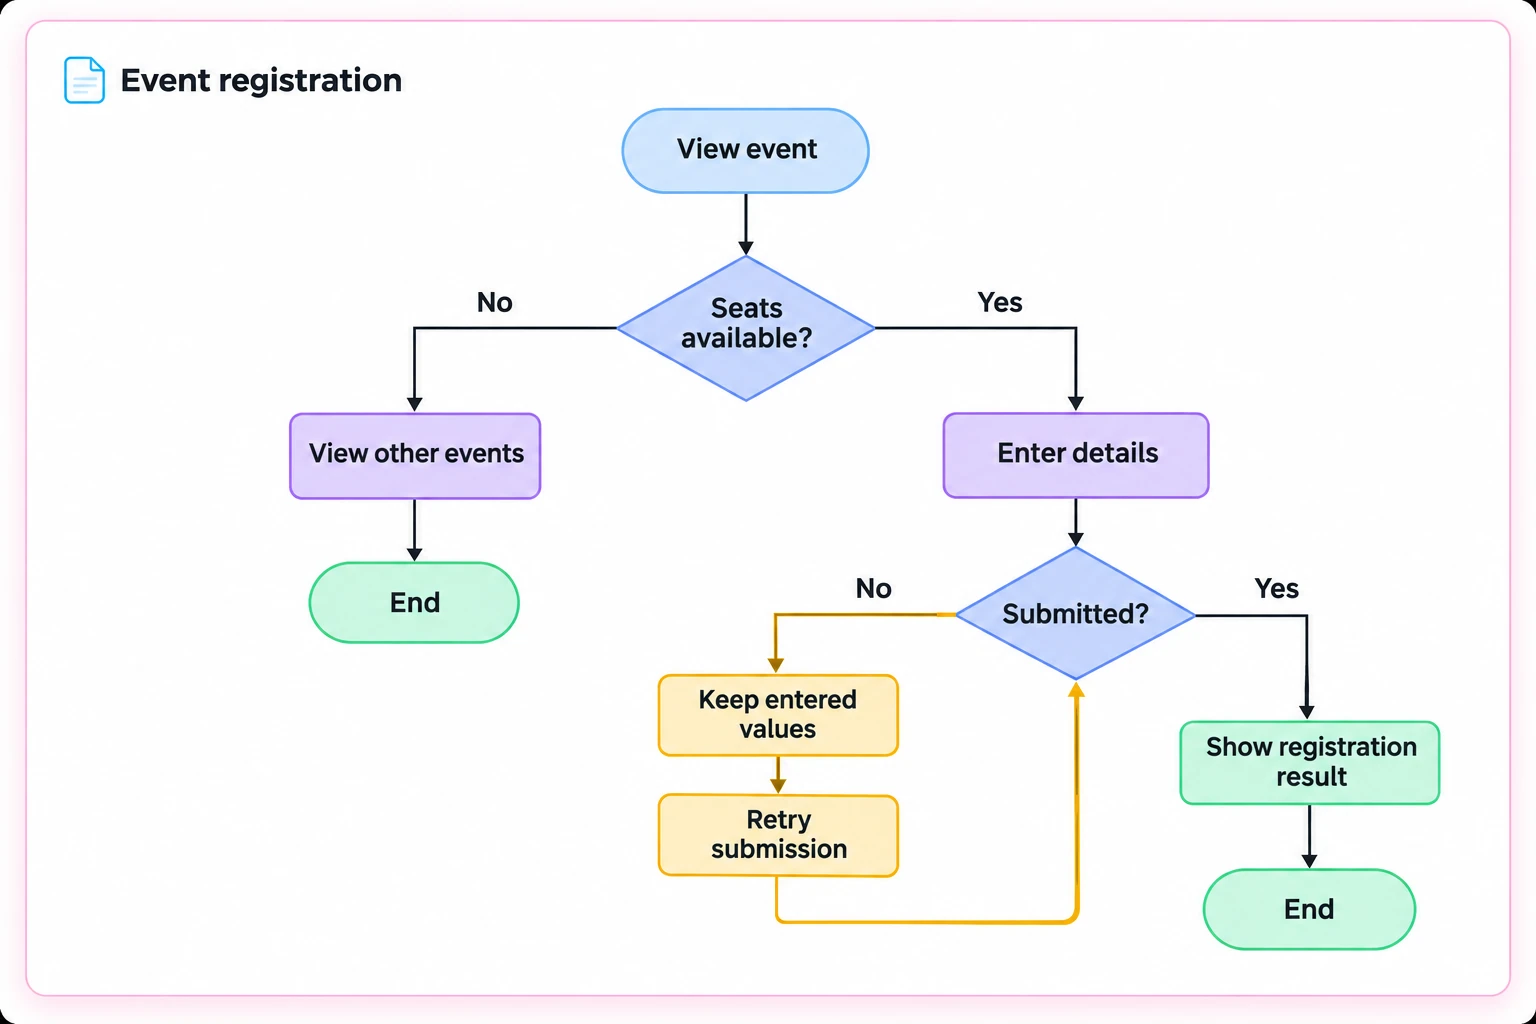
Event registration flowchart separating seat availability from submission success and retries
No seats available? Offer another event. Submission failed? Keep the form data and allow a retry.

Phrase decisions as questions

Label the branches from “Are seats available?” with Yes and No so readers do not have to guess what the arrows mean.

Make each outcome clear

Show a confirmation when registration succeeds. When there are no seats left, direct people to other events. Keep those outcomes distinct.

Keep the context for retries

After a failed submission, preserve the entered information and return to the submission step. Do not make people fill out the form again.

Event registration · Path checks

Walk through both decisions and the exception paths

The example uses two decisions: whether seats are available and whether submission succeeds. Check these three paths after generating the diagram. A full event and a failed network request should not lead to the same end node.

Starting conditionsExpected pathWhat to check
Seats available; submission succeedsView event → Enter details → Submit → Registration confirmedThe confirmation shows the registration details and the next available actions.
No seats availableView event → No seats available → Explore other eventsDo not send people into a form they cannot complete.
Seats available; submission failsEnter details → Submission fails → Keep form data → RetryReturn to submission without requiring the details again or creating a duplicate registration.

Prefer to build or edit the diagram yourself? Open the Flowchart Maker, or copy the event registration prompt below to generate a first draft.

From description to diagram

Create your first flowchart in three steps.

  1. Outline the process

    List the roles, actions, decision rules, and exceptions. Start with one main flow if the larger process is complex.

  2. Generate a flowchart draft

    Check the order of the nodes, the direction of the arrows, the branch labels, and the start and end points.

  3. Refine it with your team

    Add missing paths and adjust the labels and layout. During review, walk through each successful and failed outcome with your team.

A prompt to get started
Create an event registration flowchart.
Main flow: View the event → Check whether seats are available → Enter registration details → Submit → Show the registration result.
No seats available: Offer other events to explore.
Submission fails: Preserve the entered information and allow another attempt.
Use start/end, process, and decision nodes. Label decision branches with their conditions.
Do not add steps I have not specified, such as payment or identity verification.

Questions about AI flowcharts

What should I check after AI generates a flowchart?

Check the sequence of actions, decision conditions, branch destinations, recovery paths, and end states. A tidy diagram can still contain incorrect rules, so the process owner should confirm any important workflow.

Can I generate a flowchart from a long requirements document?

Provide the relevant requirements and define the scope of the flow you need. For a long document, start with one user task or subprocess, then add the connected parts gradually.

Should I use a flowchart or a mind map?

Use a flowchart to show sequence, decisions, and return paths. Use a mind map to organize topics and their hierarchy. Both can be useful at different stages of the same project.

Do I need to redraw an existing flowchart?

If the existing structure works, focus on missing decisions or exception paths. Use Mockitt's flowchart workspace when you want to edit the diagram manually and discuss it with your team.

Write down the process. Give your flowchart a starting point.

Generate a flowchart