
To draw a readable flowchart, define the process outcome first, use a small set of familiar shapes, attach connectors to the shapes, and label every decision branch. Keep the main path moving in one direction, then add a clearly named return path for exceptions. A Mockitt flowchart lets you keep the shapes, connectors, and review notes editable while the process is still changing.

1. Start with the outcome and boundaries
Write the process outcome in one sentence, such as “A requester receives an approved or rejected equipment booking.” Then name the trigger, the owner of each handoff, and the point where the process ends. Do not begin with every possible exception. A clear boundary gives reviewers a way to tell whether a step belongs in the diagram.
List the input and the decision that changes the path. For an equipment request, the input might be an item, date, and requester. The first decision might be whether the item is available. These details determine which shapes and labels the flowchart needs.
2. Choose shapes that communicate meaning
| Shape | Use it for | Labeling rule |
|---|---|---|
| Terminator | Start or end of the process. | Name the event, such as “Request received” or “Booking confirmed.” |
| Process | An action or transformation. | Use a verb and an object: “Check inventory.” |
| Decision | A condition with two or more outcomes. | Write the condition as a question and label every outgoing branch. |
| Data or document | Information entering, leaving, or being recorded. | Name the artifact and its owner. |
Consistency matters more than decoration. If the same shape means different things in different parts of the diagram, add a legend or simplify the notation. Use swimlanes only when ownership changes are part of the question; too many lanes can make a small process harder to scan.
3. Connect the main path before exceptions
Place the start at the top or left and connect the expected path to the end. Keep the reading direction stable and leave enough space for connector labels. Attach connectors to shape connection points so moving a step does not leave a floating line. Use arrows only when direction matters and avoid crossings that make the next step ambiguous.
At each decision, use short branch labels such as “available” and “unavailable.” A yes/no label is acceptable only when the condition is obvious. If a decision has three outcomes, name each outcome rather than relying on line color.
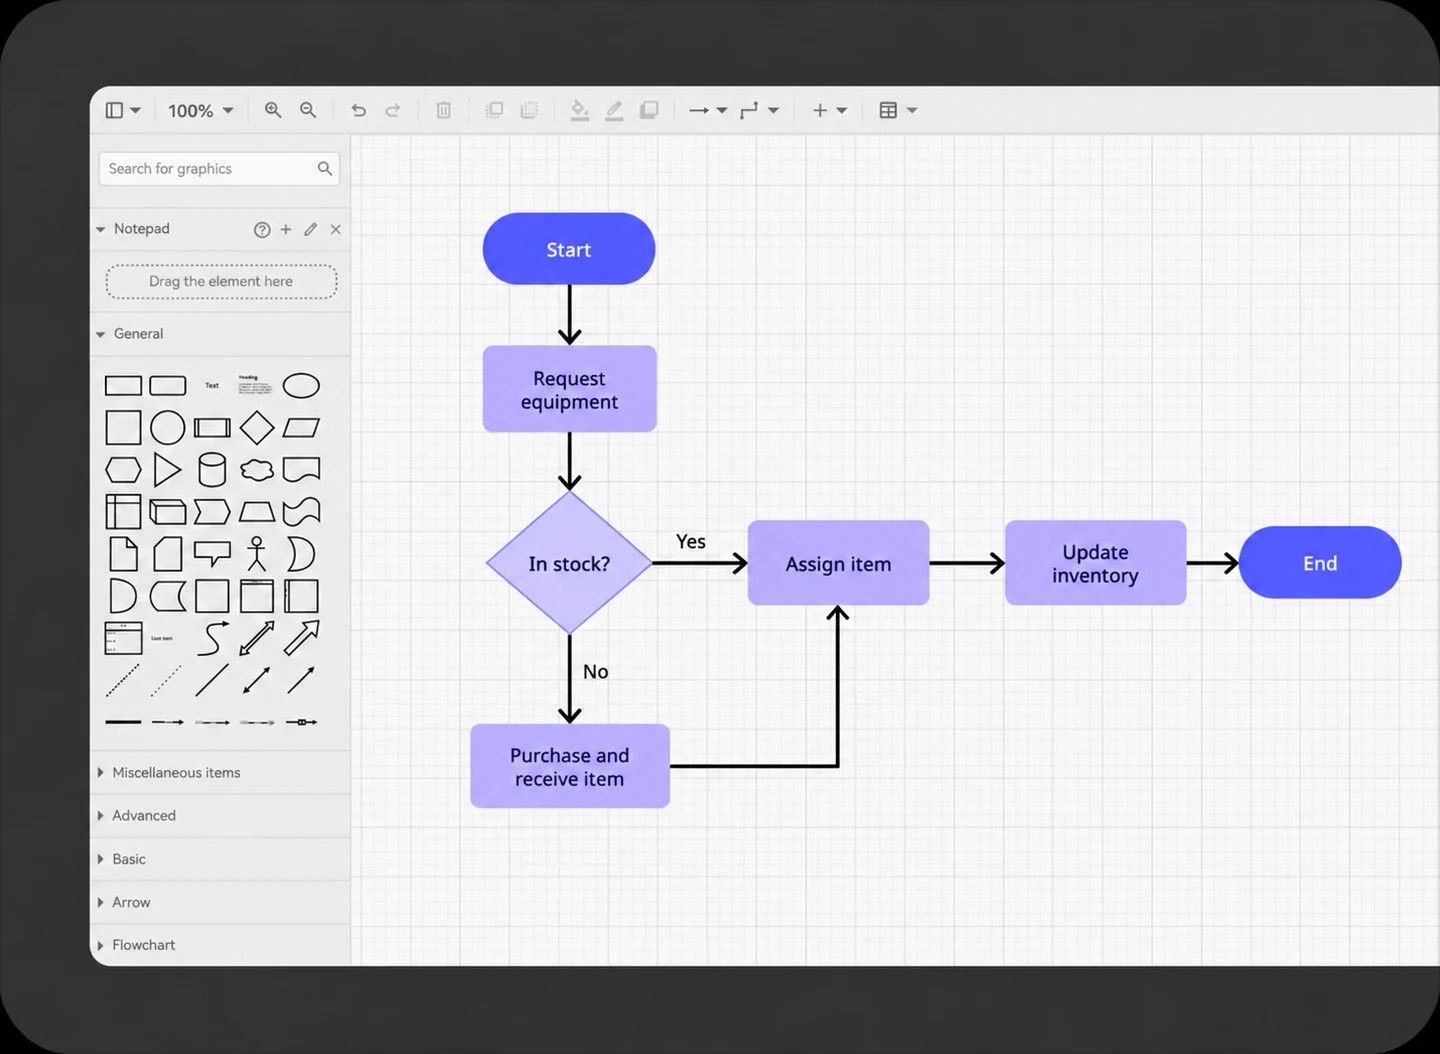
4. Add one recovery and return path
Most process confusion appears after a failure. Add a return path for an unavailable item, missing approval, invalid input, or timeout. Name where the process returns and what information it keeps. “Return to request details with the date preserved” is more useful than a loop with no explanation.
Do not route every exception to the start. If the person can correct the input at the previous step, return them there. If a different owner must resolve the issue, show the handoff and the expected response. Keep loops outside the main path when possible so the happy path stays readable.
5. Review the diagram with a trace test
- Ask someone to trace the main path without narration.
- Ask what each decision condition means and where each branch goes.
- Trace the recovery path from the failure back to the next useful action.
- Check that every step has an owner or an explicit system action.
- Remove duplicate steps, isolated nodes, and labels that rely on color alone.
Read each path aloud as a short story. If the sentence stops making sense, a step or connector label is probably missing. Check narrow screens and exported images too; a layout that works only at full canvas width is not ready to share.
6. Share the editable source
Keep the editable flowchart as the source of truth and export a static image only for a document that needs it. Include the purpose, scope, owner, last review date, and unresolved assumptions. Link related requirements or prototypes where a reader needs more context, but do not hide a critical rule in a separate file.
A strong flowchart answers three questions quickly: where does the process start, what changes the path, and how does a person recover? Clear shapes, attached connectors, explicit labels, and one readable return path make those answers visible.
Worked example: an equipment request
Use this sequence to check a small flow before adding more detail: Request received → Check availability → decision “Item available?” → Reserve item → Send confirmation. The “unavailable” branch goes to Explain the issue, then returns to Choose another item with the requested date preserved. Every branch tells the reader what happened and where the requester can go next.
If another team owns approval, add a handoff after reservation and name the expected response. If the requester can change the date, connect that action to the relevant step instead of drawing a loop to the start. This is where ownership and retained context matter more than adding decorative symbols.
Layout rules for a flowchart people can scan
- Keep the main path on one visual line and place exceptions beside the step that creates them.
- Use consistent spacing so a connector never appears to point at the wrong shape.
- Keep labels close to their branch and avoid line crossings through text.
- Break a very large process into linked subflows with clear entry and exit names.
- Use color as a secondary cue; the shape and label must still communicate meaning in grayscale.
Before publishing, zoom out until the whole process is visible, then zoom in to inspect each decision. Ask a reviewer to point to the next step without tracing with a finger or receiving narration. If two paths can be read at once, add spacing, a lane, or a subflow boundary rather than shrinking the type.
Maintain the source as the process changes
Add an owner and review date to the diagram. When a rule changes, update the step, branch label, and any linked requirement together. Keep a short change note for a decision that affects downstream teams. An editable source makes this maintenance safer than replacing the flowchart with a screenshot in a document.