A web app mockup lets a team inspect the interface before implementation: what information is visible, how controls are arranged, and whether the proposed layout supports the task. Use an interface design workspace to build the screens, then add prototype links where behavior needs review. A mockup can reveal design problems early, but it does not prove the implemented app will function correctly.
What is Web App?
A web app runs through a browser and lets people perform tasks such as completing forms, managing records, or comparing information. The interface uses browser technologies, while servers and other services may store data and apply business rules. The design should explain those tasks and states without assuming that every visual element is already connected to a working service.
A Tool for Creating a Web App Mockup
Mockitt provides components, editable screens, interaction links, and collaborative review. You can start from a blank project or adapt a suitable example. Reusable controls help maintain consistency across screens, while a linked prototype lets reviewers inspect the proposed task sequence.
Share a preview with the people who need to evaluate the design and confirm their access. Check current account capabilities and limits before relying on a particular library, export, or sharing option. Choose the tool by the review you need to conduct rather than an unsupported claim that one tool is universally better.

How to Do Web App Mockup
The six steps below cover projects, widgets, links, reusable components, notes, and preview. Start with one decision the app needs to support, and expand only after its information and behavior are clear.
Step 1: Create a New Project
- Create a prototype project, choose a suitable web screen size, and give it a task-specific name. A blank project avoids carrying irrelevant sample navigation into the mockup; a template can still be useful if it matches the task.
- Adjust the screen dimensions and inspect the layout at the sizes you intend to support. Recheck table columns, long names, and button labels after resizing.
Step 2: Add and Edit Widgets to Your Web Application Mockup
- Add the basic controls and information from the component libraries. Their exact location may differ from the earlier interface in the retained screenshot. Organize the screen around a meaningful reading order before adding decorative detail.
For example, mock up a purchasing app that compares supplier quotations. Give each row a supplier name, delivery date, and status, then open a selected quotation in a detail view. Keep the selected supplier visible so the reviewer can verify that the detail belongs to the row they chose.
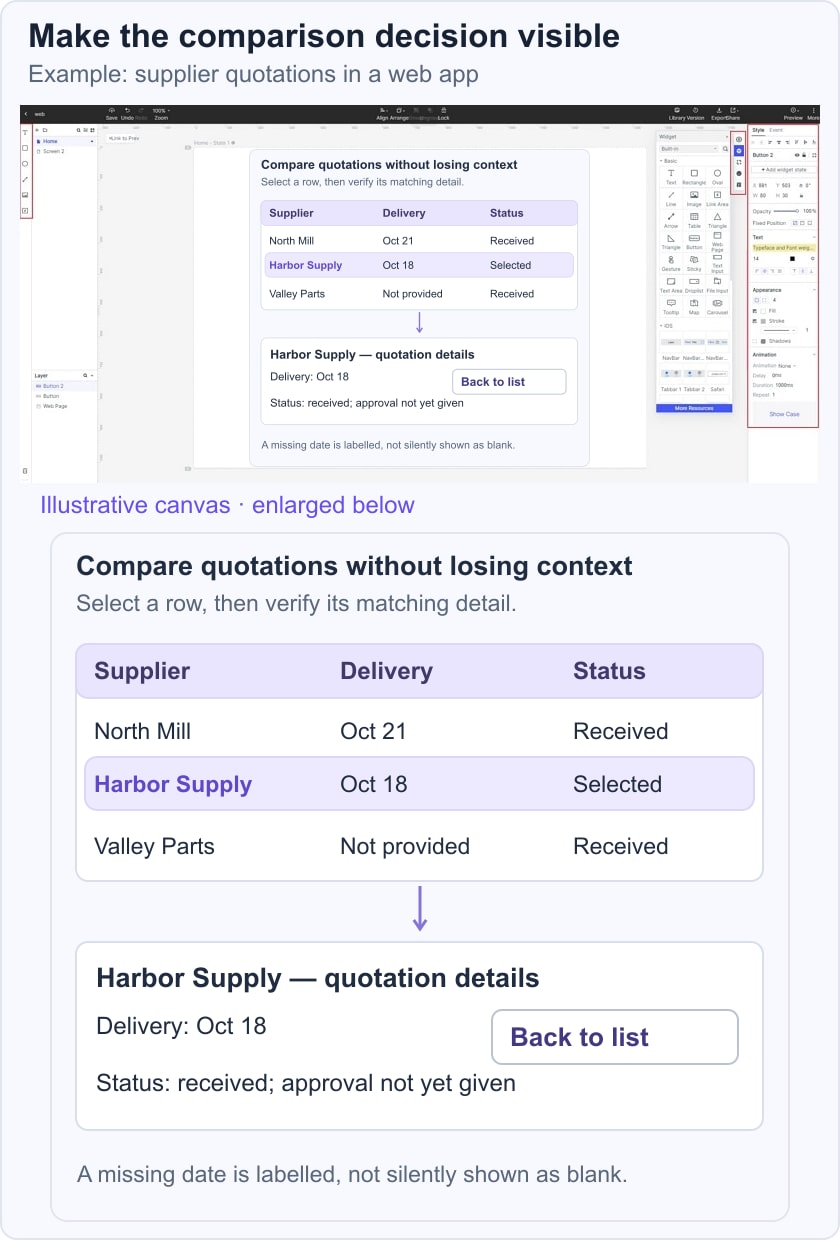
- Edit component properties such as text, width, spacing, and color. Try a long supplier name and a missing delivery date. The mockup should distinguish “Not provided” from an empty value that could look like a loading error.
- Save repeated table rows, status labels, and action buttons as reusable components where appropriate. Consistency helps reviewers compare information rather than relearn a control on every screen.
Step 3: Add Links Between Screens
- Connect a quotation row or its view action to the corresponding detail screen. Add a return path that preserves the intended selection or filter. Choose the trigger and transition to explain behavior, not to hide the relationship between the list and detail.
Step 4: Reuse Components Across Screens
- Use reusable components for elements that should change together, such as the quotation status label. The original tutorial calls these “Masters.” Check how shared edits affect instances before applying a change to every screen. A component should share a design rule, not force unrelated content into the same appearance.
Step 5: Add Notes to the Web App Mockup
- Use annotations to explain rules that the mockup cannot implement. For this example, identify where quotation data comes from, who may approve a quotation, and what happens when the supplier changes a value. Keep internal notes separate from customer-facing text.
Step 6: Preview and Review the Mockup
- Open Preview and ask a reviewer to compare two quotations, open one, and return to the comparison. Check whether they can identify the selected supplier and understand the status. Use current supported sharing methods for the review.
When the layout is clear, record what remains for implementation: real data, permissions, filtering, keyboard behavior, and loading or error states. A connected mockup demonstrates the proposed interaction, not the application’s backend. The navigation design guide can help refine the list-to-detail path.
Keep the review focused. If people cannot compare the quotations, first check whether the necessary information is visible and labelled consistently. Adding more screens or animation will not solve a missing decision criterion.