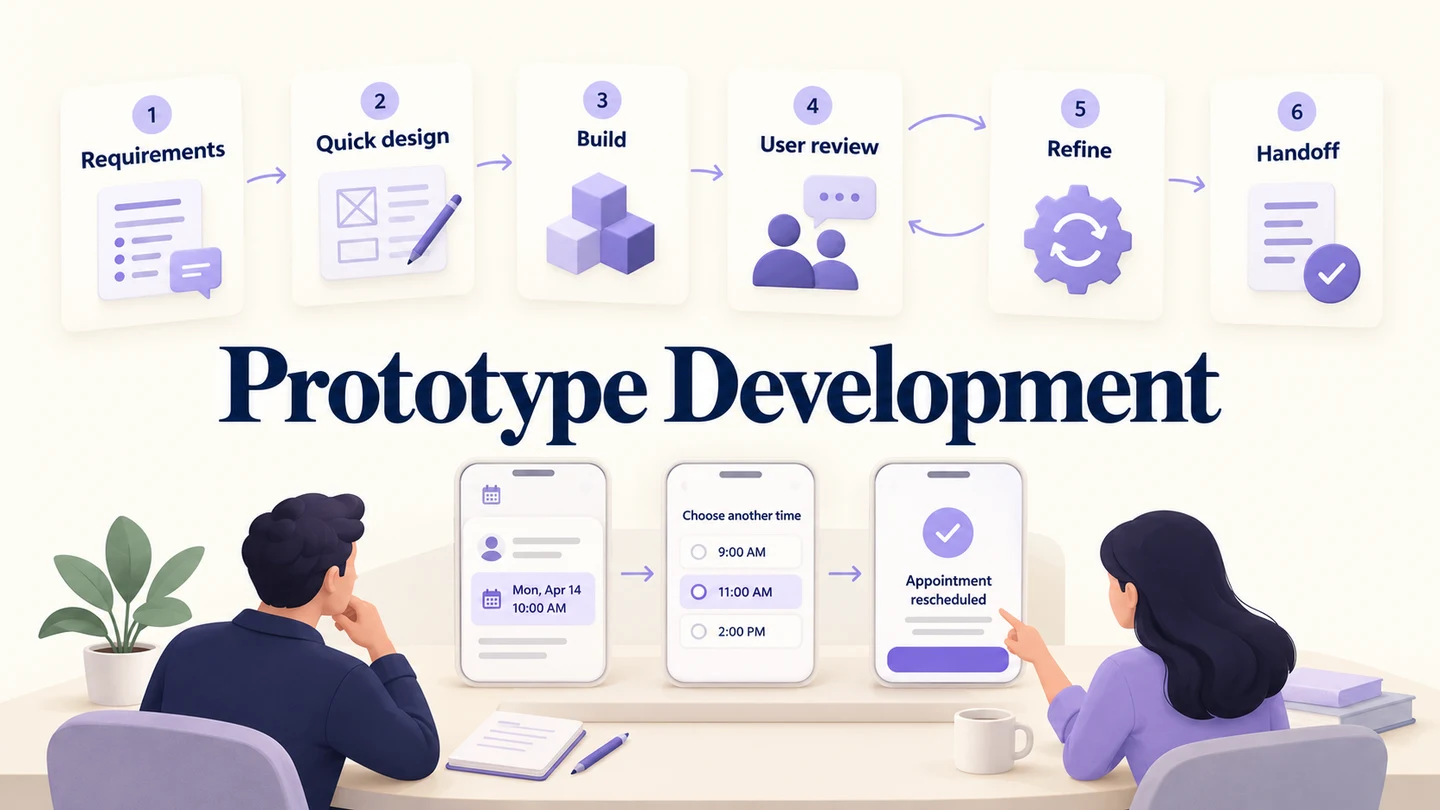
Prototype development turns an uncertain product idea into a model that people can review before the team commits to implementation. For a software interface, the usual cycle is to gather requirements, sketch a design, build a prototype, observe users, refine it, and hand over the decisions that are ready for development.
You may be near the final stage of a project when a client points out that a module does not work as expected. A prototype can expose that misunderstanding earlier. It simulates selected parts of the product so users can see and try the proposed experience. With Mockitt's interactive prototyping tools, you can connect the screens needed for that review without first building the complete application.
The goal is to reduce uncertainty, not to make every screen look finished. The six stages below use an illustrative appointment-rescheduling flow: a person opens an existing booking, chooses another time, and checks that the change has been confirmed.
What Is Prototype Development?
The Definition of a Prototype
A prototype is a draft or model used to explore and evaluate an idea. Depending on the question and complexity of the project, it can range from a drawing on paper to an interactive model of selected screens. It helps a team demonstrate an idea before investing in full product development.
A prototype is not necessarily an early release of the software. A clickable interface may contain sample data and simulated responses, with no production database or payment processing behind it. Beta testing, by contrast, evaluates a version of implemented software. A convincing prototype does not establish that the production system is secure, fast, or technically feasible.
Prototype development is an iterative process: create enough of the experience to answer a question, collect useful feedback, and change the model. You can begin with a low-fidelity prototype when navigation and content structure are still uncertain. Add detail when the next decision depends on realistic content, visual hierarchy, or more precise behavior.
Six Stages of Prototype Development
The main stages provide a practical sequence, but evaluation may send you back to requirements or design. Agree on the question for each round before adding more screens.
Step 1: Gather and Analyze Requirements
Prototyping starts with collecting the requirements for the project. Ask clients and intended users how they expect the product to look and function. The team can then analyze those expectations and decide what the prototype needs to represent.
For the rescheduling example, define who may change an appointment, how close to the appointment they may change it, and what happens if the chosen slot becomes unavailable. Separate a confirmed rule from an assumption. If the cancellation policy is undecided, record it as a question instead of quietly inventing it in the interface.
Useful output: one task, its starting conditions, the important business rules, and a list of unresolved questions. This is a more useful brief than “make the booking screen better.”
Step 2: Make a Quick Design
Create a simple design of the part of the product you need to explore. This is not the final design; it will need modifications in response to user feedback and the requirements. A rough layout gives the team enough direction to build the first prototype quickly.
Sketch the existing booking, the available-time selection, and the confirmation. Keep the appointment details visible when the user chooses a new time. Add a way to leave without making a change. Decorative illustrations and a complete account-settings area do not help answer this particular task.
Useful output: a small screen map with the main route and one consequential alternative, such as an unavailable slot.
Step 3: Create the Prototype
Build a working model based on the gathered requirements. The model needs to behave convincingly for the chosen task; it does not need to equal the finished product. Give buttons meaningful labels and connect both forward and return paths.
In the example, selecting a new time should lead to a review or confirmation state that shows the revised appointment. A simulated unavailable-slot state should let the person choose another option. Use fictitious appointments and keep notes about what is simulated. The step-by-step prototype tutorial covers the detailed screen-building workflow.
Useful output: a repeatable route that opens at the correct starting screen and can be reset before the next review.
Step 4: Evaluate with Users
Present the proposed design to people who would use the product. Their actions and feedback can reveal flaws in the working model. Collect those observations and give them to the designer or prototype developer for improvements.
Give a task rather than a tour: “Your appointment no longer fits your schedule. Move it to a different available time.” Watch whether the person finds the rescheduling action, notices the new time, and understands whether the change is complete. Avoid pointing to the next button or treating a polite “looks good” as evidence that the flow works.
Useful output: a short observation log that distinguishes what happened, what the person said, and the team's interpretation.
Step 5: Refine the Prototype
If the review reveals a problem, refine the design and evaluate the changed part again. Not every suggestion needs to be implemented. Prioritize changes by their effect on the task, the supporting evidence, and the constraints of the product.
Suppose a reviewer cannot tell whether the old appointment still exists. The useful change is to show the old and new times clearly at the decision point and make the final state unambiguous. Adding a decorative animation would not address that observation. Record the reason for the change so the next reviewer can evaluate it.
Useful output: a revised flow and a decision log. Move toward implementation when the important open questions have answers; carry unresolved questions forward explicitly.
Step 6: Hand Over and Implement
The development team implements the agreed behavior, tests the software, and prepares it for deployment. The product still needs production testing and ongoing maintenance; prototype approval does not replace either.
Hand over the screen flow, labels, relevant states, decisions, and constraints. For this example, a developer needs the real availability rule and what happens when two people request the same time. A linked screen demonstrates the proposed response but does not implement that concurrency rule.
| Stage | Rescheduling example | Decision before moving on |
|---|---|---|
| Requirements | Who can change an appointment and when? | Known rules are separated from assumptions. |
| Quick design | Existing booking → new time → confirmation | The route includes a safe exit. |
| Build | Linked screens with sample appointment details | The task and recovery route can be attempted. |
| User review | A person attempts to reschedule unaided | Observed difficulties are recorded specifically. |
| Refine | Clarify the changed time and completion state | The revision addresses an observed problem. |
| Implementation | Build real availability and booking behavior | Simulated behavior and open requirements are documented. |
Using Mockitt for Prototype Development
Choose a tool that suits the product you are designing and the kind of feedback you need. Mockitt supports interface layouts, reusable widgets, screen connections, interactive states, preview, and shared review. It is useful when a team needs to discuss an app or website's behavior before implementation.
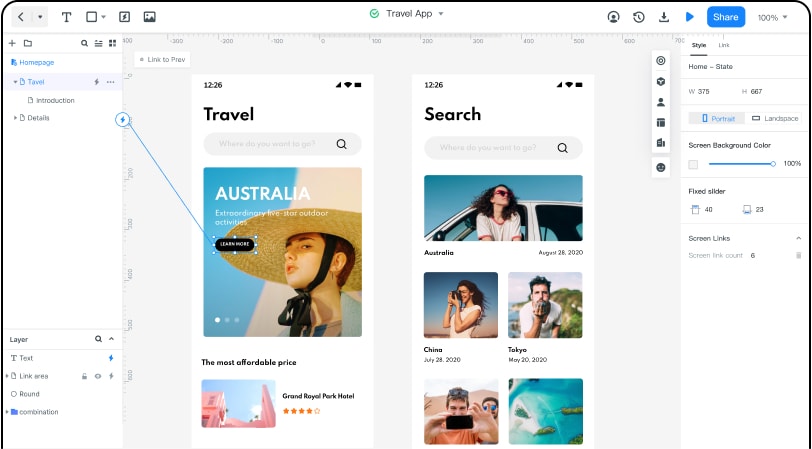
Start with the widgets and screen sizes you need, then connect the actions that matter to the review. Preview the route before inviting others. A prototype sharing link lets reviewers open the experience, while its access settings control how the prototype is shared. Use the sharing options appropriate to the information in the project.
An interactive preview is a design artifact, not a compiled iOS or Android application. If the decision depends on a real integration or performance constraint, pair the interface prototype with a technical investigation rather than implying that the preview proves implementation feasibility.
Useful Tips for Prototype Development
Keep things simple while creating a prototype. Combine repeated interface elements into reusable components and remove connections that do not help the task. Simplicity should make the intended behavior clearer, not remove the error states that determine whether the design is usable.
Choose the medium to match the question. Paper screens are enough for an early conversation about structure; an interactive model is more useful for reviewing navigation or transitions. Foam models may help physical-product work, but they are not a required step in a software-interface project.
Involve users while decisions are still inexpensive to change. Before each review, check the starting screen, sample content, intended route, and reset behavior. After it, record the evidence behind the next revision. A small prototype that resolves a real uncertainty is more useful than a large, polished demonstration with no clear decision attached to it.